
There’s something magical about the combination of ripe peaches and silky cream layered inside a soft, golden cake. A peaches and cream cake isn’t just another dessert—it’s a comforting, nostalgic dish that brings the joy of summer to your table. Whether you’re celebrating a birthday, hosting a brunch, or simply treating yourself after dinner, this cake delivers the perfect blend of fruitiness, sweetness, and fluffy texture.
Moreover, this guide goes beyond a simple recipe. You’ll discover tips, tricks, and preparation methods that ensure a successful bake every single time. From selecting the best peaches to whipping the perfect cream, every detail matters.
What Is a Peaches and Cream Cake?
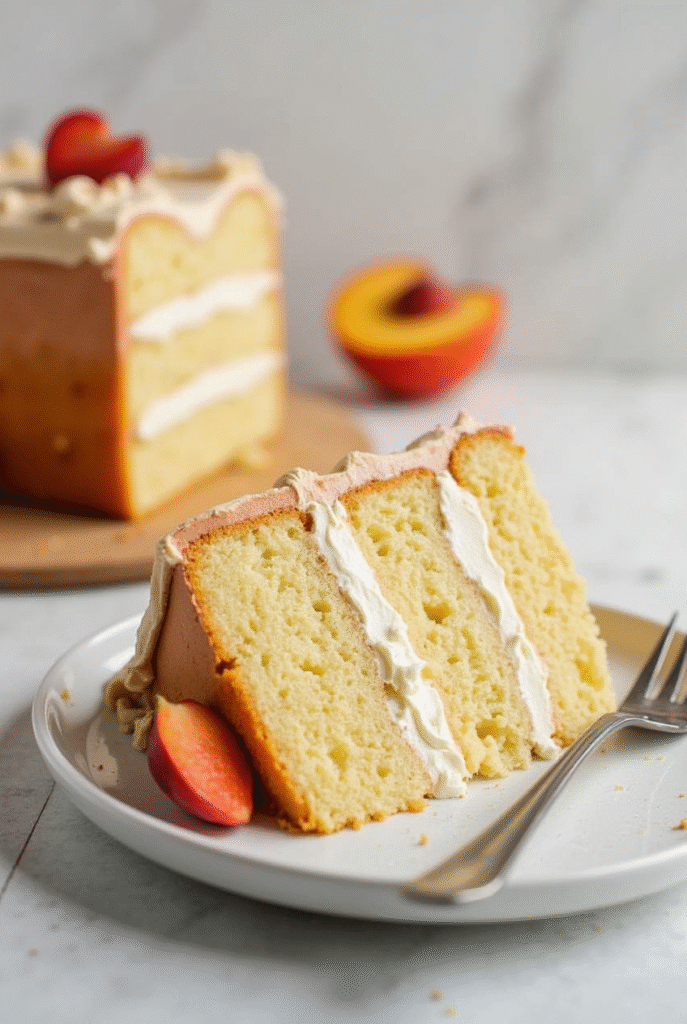
A peaches and cream cake is a layered dessert that pairs juicy peaches with whipped cream and sponge cake. Each bite brings a balanced mix of textures and flavors—light, airy cake; sweet, tender fruit; and smooth, cool cream.
Initially, this dessert became popular in regions where peaches flourish, like Georgia and South Carolina. Over time, it evolved into various styles: trifles, icebox cakes, or even cheesecakes. Regardless of the version, the central elements remain: fresh peaches, whipped cream, and a soft base.
Generally, this cake is served chilled, making it ideal for warm-weather gatherings. Because it is light and refreshing, many home bakers use it as a staple during summer potlucks, baby showers, or weekend brunches. In fact, it’s as easy to prepare as it is impressive to serve.
Additionally, it allows for creative customization. For instance, you can add raspberry coulis, swap in almond-flavored whipped cream, or experiment with sponge cake substitutes. The possibilities are as wide as your imagination.
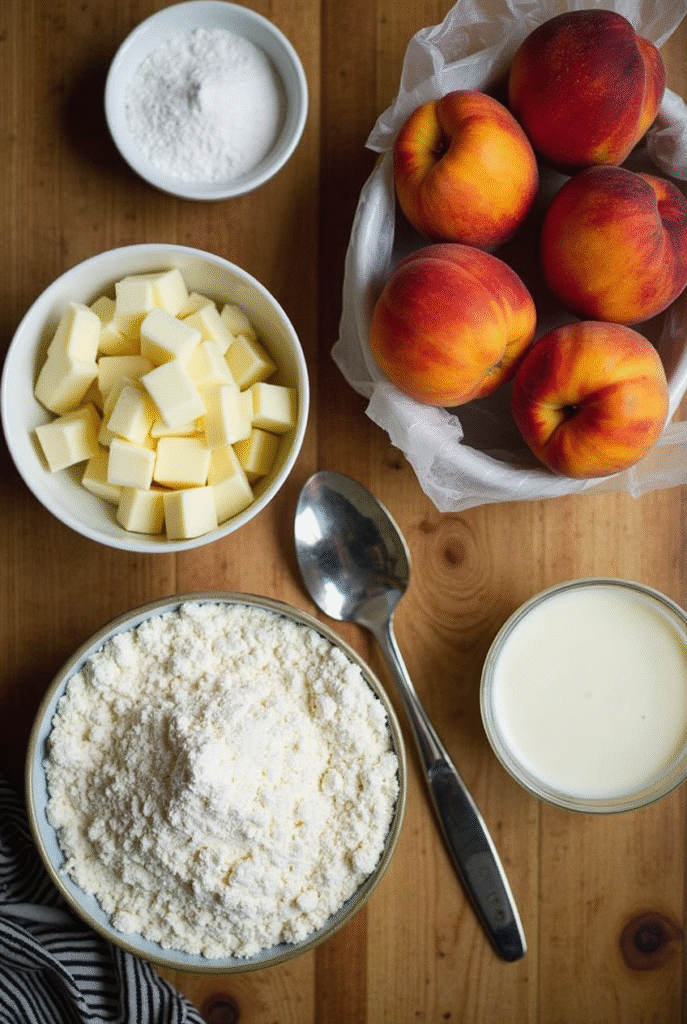
Ingredients for Peaches and Cream Cake – What You’ll Need
Before you start, gather your ingredients. Because the flavor of this cake relies on freshness, quality ingredients make a noticeable difference.
Although canned peaches can be used, fresh ones provide a firmer texture and richer taste. Also, heavy cream with high butterfat content ensures that your whipped topping holds its shape. Furthermore, adding a dash of vanilla brings everything together with warmth and depth.
To illustrate what you’ll need, here’s a clear table of ingredients:
| Ingredient | Amount | Notes |
|---|---|---|
| All-purpose flour | 2 cups | Substitute with gluten-free blend if needed |
| Baking powder | 1 tbsp | Helps cake rise evenly |
| Eggs | 3 | Room temperature for better emulsification |
| Sugar | 1 cup | White or coconut sugar both work well |
| Fresh peaches (sliced) | 4 large | Peeled and thinly sliced |
| Heavy whipping cream | 1.5 cups | Must be cold for stable whipping |
| Vanilla extract | 1 tsp | Adds aromatic flavor |
| Milk | 1/2 cup | Whole milk is preferred |
| Butter | 1/2 cup | Unsalted and melted |
| Lemon juice | 1 tbsp | Keeps peaches from browning |
Surprisingly, many bakers like to brush the sponge layers with a flavored syrup. This helps lock in moisture and enhance the peach essence. For that reason, some even use a spoonful of syrup from canned peaches if fresh juice isn’t available.
In some recipes, a thin layer of fruit preserve—such as canning cranberry sauce—is added for a contrast in color and taste. This sweet-tart touch can really elevate the overall flavor.
How to Make Peaches and Cream Cake Step-by-Step
This cake may look fancy, but its process is simple and beginner-friendly. Follow these steps carefully to achieve beautiful, bakery-style results.
Step 1: Make the Sponge Cake Layers
First, preheat your oven to 350°F (175°C). Then, line two 8-inch round cake pans with parchment paper and grease the sides with butter.
Next, whisk the flour and baking powder together in a large bowl. In another bowl, beat the eggs and sugar until pale and fluffy. This step takes about 5 minutes and is crucial because it introduces air into the batter.
After that, fold in the flour mixture gently. Then, add melted butter, milk, and vanilla extract. Stir until just combined. Overmixing will result in a dense cake, so be careful.
Pour the batter evenly into the pans. Bake for 25 to 30 minutes or until a toothpick inserted in the center comes out clean. Afterward, let the cakes cool completely before removing them from the pans.
Step 2: Prepare the Whipped Cream
Meanwhile, start on your cream. Pour the cold heavy cream into a chilled mixing bowl. Beat on high speed until soft peaks form.
After that, add the sugar and vanilla extract. Continue beating until stiff peaks form. Be sure not to overbeat, or the cream may curdle.
If you’re serving the cake at a warm event, consider stabilizing your whipped cream. To do so, dissolve one teaspoon of unflavored gelatin in two tablespoons of warm water. Let it cool slightly, then mix it into the whipped cream during the soft peak stage. Consequently, your whipped topping will hold up for hours.
Step 3: Prepare the Peaches
While the cake layers are cooling, wash, peel, and slice your peaches. For extra flavor, toss them in lemon juice and a sprinkle of sugar. This not only brightens the taste but also prevents browning.
If using canned peaches, drain them thoroughly and pat them dry. Because excess syrup can make the cake soggy, it’s important to remove as much moisture as possible.
At this point, you can also reserve some peach slices for garnishing the top later.
Step 4: Assemble the Cake
Once the sponge layers have cooled, you’re ready to build your masterpiece. Begin by placing one layer on a cake stand or serving plate.
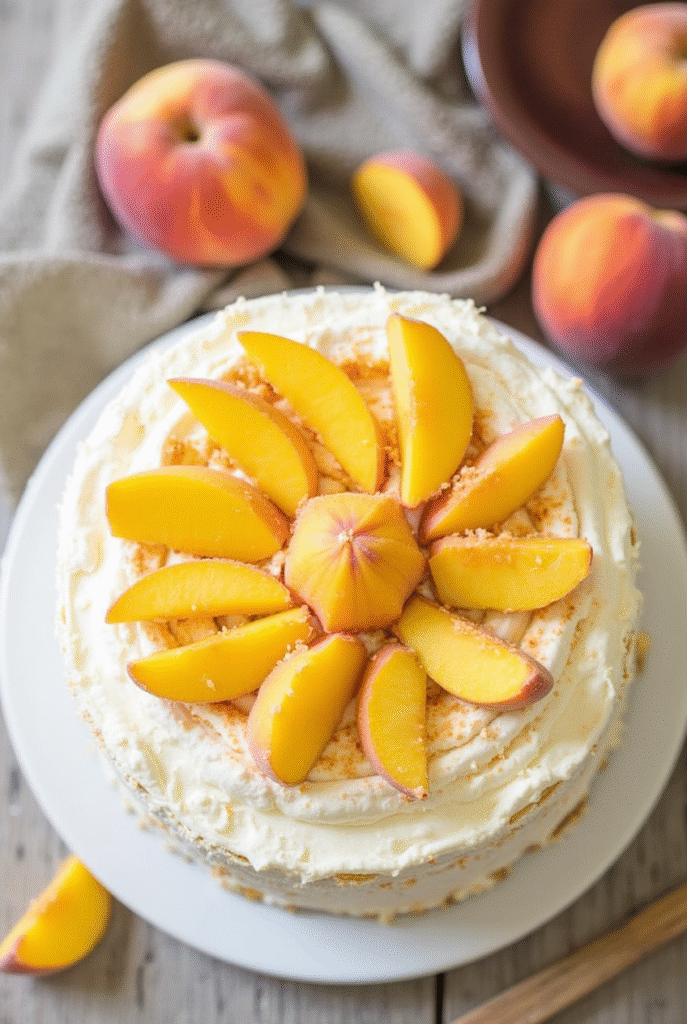
Spread a generous layer of whipped cream over the top. Then, arrange a single layer of peach slices over the cream.
Next, add the second cake layer. Repeat the process by topping with cream and peach slices. For a decorative finish, layer the peaches in a spiral or fan shape. You could even pipe a border of whipped cream around the edges.
Optionally, dust the top with powdered sugar or garnish with mint leaves. If you’d like a little extra flair, drizzle some honey or peach syrup over the top before serving.
Interestingly, for an extra twist, you might try swapping in mascarpone cheese for part of the whipped cream. This adds a slightly tangy flavor and a firmer structure. Alternatively, you could layer in soft ladyfingers to create a tiramisu-style dessert.
To expand your dessert inspiration, check out our Keebler Cheesecake Recipe for another creamy, fruit-friendly treat!
Additional Preparation Tips
Use Room Temperature Ingredients
Always use room temperature eggs and milk. This helps ingredients mix more evenly and improves the cake’s texture.
If your ingredients are cold, your batter may become lumpy. So, set them out at least 30 minutes before you start baking.
Cool the Cake Before Frosting
Don’t rush to frost your cake. If it’s still warm, the cream will melt. To avoid this, let your layers cool completely on a wire rack.
You can even refrigerate them for 30 minutes before assembling. This step makes layering cleaner and helps the cake hold its shape.
Chill Before Serving
After assembling, refrigerate the cake for at least one hour. This allows the cream to firm up and the flavors to meld together.
Chilling also makes slicing easier, preventing the layers from sliding apart.
Make It Ahead
This cake can be made a day in advance. In fact, it tastes better the next day, once the layers have absorbed some of the peach juices.
Store it in an airtight container in the fridge. It stays fresh for up to three days, although it’s best enjoyed within 48 hours.
What to Serve With Peaches and Cream Cake
Because this cake is light, it pairs well with equally refreshing beverages. Consider iced tea, lemonade, or a glass of Prosecco.
For contrast, serve it alongside a tart sorbet or a platter of fresh berries. These additions balance out the sweetness and make your dessert spread even more impressive.
Can’t Get Enough Dessert?
For more delicious, fruit-filled desserts and summer cake ideas, explore our growing collection on the recipes page. Whether you’re craving breakfast treats or elegant confections, you’ll find something to love.
How to Make Peaches and Cream Cake Step-by-Step (Continued)
After layering the sponge, cream, and fresh peach slices, your peaches and cream cake is nearly complete. However, there are still a few finishing touches that can elevate both the flavor and appearance of your dessert.
Firstly, gently press the top cake layer down to secure the structure. This ensures the whipped cream settles evenly and doesn’t spill over the edges. Secondly, take an offset spatula and smooth the whipped cream around the sides. You can either fully frost the cake or opt for a trendy semi-naked look by scraping off excess cream to reveal the sponge layers beneath.
Afterward, arrange your reserved peach slices on top. You might choose to spiral them from the center outward or fan them in layers. Additionally, consider garnishing with a sprig of mint or a sprinkle of powdered sugar for a polished presentation. For added elegance, drizzle a thin stream of honey across the fruit topping.
Moreover, if you’d like a crunchy contrast to the soft cream and sponge, you can sprinkle crushed graham crackers or toasted almonds around the edge of the cake. These textures create a satisfying bite that balances the moist and airy layers. Some bakers also add a light brush of peach syrup between layers for enhanced flavor and moisture retention.
Notably, pairing your cake with complementary dishes makes it even more delightful. For those building a full brunch or dessert spread, the scungilli recipe guide offers a savory, sophisticated option that balances this sweet creation beautifully.
After assembly, refrigerate your cake for at least one hour. This step allows the flavors to meld and the cream to firm up for clean slicing. Use a sharp, serrated knife dipped in warm water to make precise cuts when serving.
Pro Tips & Creative Variations for Peaches and Cream Cake
Although the classic version of a peaches and cream cake is undeniably satisfying, it also serves as a great base for culinary experimentation. Accordingly, below are several tips and creative spins that allow you to tailor this dessert to any occasion or dietary need.
Whipped Cream Stabilization Tips
Because this dessert often appears at outdoor events or warm-weather celebrations, it’s essential to stabilize your whipped cream. As a result, the cake maintains its shape and visual appeal throughout the day. For example, you can add one teaspoon of unflavored gelatin dissolved in warm water to your cream during the soft peak stage. Alternatively, a tablespoon of instant vanilla pudding mix works just as effectively without affecting the flavor.
In addition, always chill your mixing bowl and beaters before whipping the cream. This simple practice improves the volume and texture of your final product, leading to a fluffier and more stable topping.
Mini and No-Bake Versions
For more casual or transportable versions, consider turning your peaches and cream cake into cupcakes or dessert jars. In this case, layer sponge cubes, whipped cream, and peach slices in mason jars for individual servings. These portable parfaits are crowd-pleasers at picnics and summer parties.
Alternatively, make a no-bake version using graham cracker layers instead of sponge cake. Combine cream cheese with whipped cream for a richer texture, then layer with peaches in a loaf pan. Refrigerate overnight to allow the layers to set. This easy adaptation skips the oven entirely, making it ideal for hot days.
Seasonal Swaps and Flavor Enhancements
While fresh peaches shine during summer, other fruits can be swapped in depending on the season. For fall, sliced apples with cinnamon add warmth and spice. In winter, canned peaches with nutmeg-spiced whipped cream provide comfort. Springtime calls for a mix of berries to add color and tartness.
Furthermore, don’t hesitate to introduce complementary flavors. A hint of almond extract in the cream or a splash of peach liqueur in the syrup adds complexity. Similarly, layering in mascarpone or cream cheese offers a tangy richness that contrasts beautifully with sweet peaches.
To keep discovering dessert inspirations and adapt them seasonally, visit our main recipes collection for a full archive of creative ideas.
FAQs About Peaches and Cream Cake
Q: Can I use canned peaches instead of fresh ones?
Yes, you certainly can. However, be sure to drain them well and pat them dry before layering. Otherwise, excess liquid may cause the cake to become soggy.
Q: How long does peaches and cream cake last in the fridge?
Generally, it keeps for up to 3 days if stored in an airtight container. Nevertheless, it’s best enjoyed within the first 48 hours while the whipped cream remains fresh and the peaches retain their texture.
Q: Can I freeze this cake?
Technically, yes—but only freeze the sponge layers. Freezing the fully assembled cake isn’t ideal because whipped cream tends to separate and lose structure once thawed.
Q: How can I keep the whipped cream from melting?
To clarify, start by using heavy cream with at least 35% fat. Then, stabilize it with gelatin or pudding mix as described earlier. Finally, refrigerate the cake until serving and avoid prolonged exposure to room temperature.
Q: Is peaches and cream cake good for summer events?
Absolutely. Because it’s light, fruity, and served cold, it makes a perfect addition to warm-weather gatherings like cookouts, pool parties, or bridal showers.
Q: Can I make this cake a day in advance?
Yes, and in many cases, it’s even better the next day. Making it ahead allows the flavors to blend, and the chilled cream firms up, leading to cleaner cuts and improved taste.
Q: What cake pan works best for layered peaches and cream cake?
Use two 8-inch or 9-inch round pans. These sizes provide optimal height and layering ease. Furthermore, removable bottom pans or springform pans simplify the process of transferring and decorating.
Q: Is it better served warm or chilled?
Chilled, without a doubt. Serving it cold allows the whipped cream to stay firm and the peaches to refresh your palate. Therefore, always refrigerate your cake until it’s time to enjoy.
Conclusion
All in all, a peaches and cream cake is the embodiment of a perfect dessert: light, flavorful, and visually stunning. Every element—from the airy sponge to the fresh fruit and cloud-like whipped cream—comes together to deliver joy in every bite. Moreover, it’s incredibly adaptable, allowing you to make it your own for any season, event, or personal taste.
So whether you’re baking for a family dinner, summer celebration, or just indulging in a little self-care, this recipe guarantees success. Follow the detailed steps, apply the expert tips, and don’t hesitate to get creative. Because once you master this dessert, you’ll find yourself coming back to it again and again.


